.png?width=300&height=300&name=Untitled%20design%20(6).png)
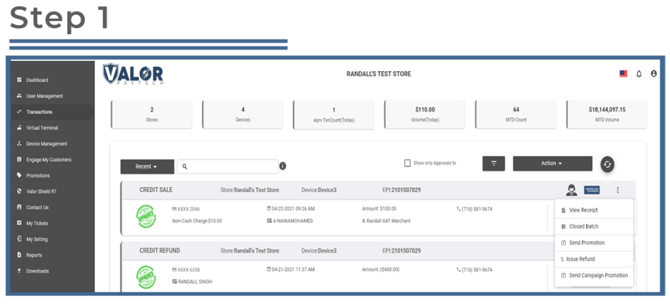
Step 1: Locate the Transaction
-
Log into the Valor Portal and navigate to the Transactions module in the sidebar menu.
-
Search for and find the specific transaction you wish to refund.
-
Click the vertical ellipsis (⋮) next to the transaction row.
-
Choose Issue Refund from the dropdown.
Step 2: Issue the First Refund

-
The Refund Confirmation dialog will open and display the original transaction amount, cardholder information, etc.
-
You can enter the refund amount where you see the original dollar amount.
-
(Optional) Enter the phone number or email address to which a receipt should be sent.
-
-
Click Proceed to execute the refund.
Step 3: Refund Confirmation

-
You will then see a confirmation screen showing the refund status (e.g., succeeded, pending).
-
Click Close to return to the Transactions list.
Step 4: Verify the Refund

Back in the Transactions list, you should now see:
-
The original transaction row, plus
-
A new refund transaction row (linked/associated) showing the refunded amount.
If you still need to issue another refund on the same original transaction (because for example you refunded part of the amount and left a remaining refundable balance):
-
Locate the original transaction again (not the refund row).
-
Click the vertical ellipsis (⋮) → Issue Refund.
Step 5: Enter the Remaining Refund Amount

-
The Refund Confirmation dialog will open. It will show the maximum refundable amount which equals:
-
Original transaction amount minus the amount already refunded.
-
-
Enter the additional refund amount (which must be ≤ that remaining balance).
-
Proceed as before: optionally enter phone/email for receipt → click Proceed → view confirmation → click Close.
-
Back on the Transactions list you’ll see the original transaction + refund row #1 + refund row #2 (for the additional partial amount).